
In article we looked at use of JSON Web Token (JWT) for authentication with that foundation knowledge in place in this article we look at IdentityServer4 that provides end points for OpenID Connect (for authentication) and OAuth 2.0 (for authorization) to ASP.NET Core application.
Common protocols used for Authentication include SAML, WS-Fed, OpenID Connect. OpenID Connect in combination with OAuth 2.0 is designed for API. The following table highlights the differences between OpenID Connect and OAuth 2.0

For a good example of authentication using OpenID Connect refer to article where we looked at providing login mechanism to Power Apps Portal through Open ID Connect using Google as Identity Provider, a capture or network traffic is as per below:

In the highlighted content the following will refer to OpenID Connect protocol
- id_token is returned in JSON Web Token format
- scope=openid is used for authentication
Being Authentication only framework what OpenID Connect does not do is provide access to the resources in the application and this is where Authorization Framework (Delegated Authorization) based on OAuth 2.0 protocol comes into effect.
The table highlighted some of the terms used in OAuth 2.0 to understand it better we will build an sample application for the following scenario the sample source code is at Git:
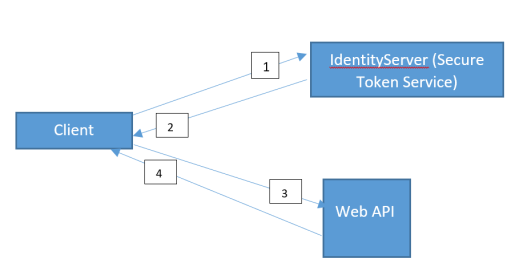
- Clients sends a request for authorization token from Secure Token Service (STS) API that has a reference to Identity Server4.
- The token presented to the client from STS will be in JSON Web Token format.
- The JSON Web Token with will be passed to the Web API method
- Dataset will be returned to the client.
The process of granting Client application to call the methods within WebAPI is commonly referred to as a OAuth flow and involves the steps involved in granting consent (permission) to invoked the methods in WebAPI
The sample code solution structure has the following highlighted projects:

IdentityServer(SecureTokenService)> SEIS.IdentitySrv
WebAPI > SEIS.Registration.Api
Client > ConsoleAppClient
An understanding of ADFS concepts will be helpful, the steps described below are synonymous to setting up relying party trust in ADFS.
Step 1: Build and Configure Secure Token Service
ASP.NET Core provides built in DI (Dependency Inject) and this capability is used to set up STS.

IdentityServer needs to have following information
- Clients trying to access WebAPI
- List of API end points IdentityServer is trying to secure
In our sample scenario they will be ConsoleApp (Client), RegistrationAPI. The plumbing code will be in Startup.cs

Config.GetAllApiResources() and Config.GetAllClients() will have pointers to WebAPI and ConsoleApp Client respectively

This will setup STS with known clients and API resources
Step 2: Build WebAPI and configure to use STS
Using DI (dependency injection) in Starup.cs specify the Secure Token Service (STS) under ConfigureServices method

Now indicate to use authentication

The above will set up API to accept access token from STS. To add permissions to Controller method(s) we need to add Authorize attribute

Step 3: Build ConsoleApp to request AccessToken from STS before invoking WebAPI methods
The first step for ConsoleApp client will be to request AccessToken from STS and then pass the token using SetBearerToken method of HttpClient object before calling the WebAPI methods

Result of ConsoleApp client

The access_token issued by STS confirms to JSON Web Token Format (reference) decoding this at jwt.io will show the following result

